BBQ Pulled Pork or Beef – restaurant style

If you love BBQ and go to a restaurant to get it, you probably don’t put just one kind of sauce on your beef or pork. You put at least two, maybe three! That’s one reason why BBQ at home never tastes the same…because we’re dumping one kind of sauce on the meat.

My BBQ is the secret sauce of mixing different flavored sauces together and adding one special ingredient. This recipe is crazy easy and freezes great!

Now you can enjoy restaurant-style BBQ at home any time you want, and any time is a delicious time for BBQ!

INGREDIENTS:

1 pack          Pork shoulder (a.k.a. pork butt, however the cut is actually the shoulder) or                                  Beef chuck roast, whichever you prefer

1-2 bottles   Red, sweet BBQ sauce (Our very favorite is Old Mule Original, but if you can’t                                find it, Sweet Baby Ray’s Original or Stubb’s Original bbq sauce works)

1-2 bottles   Tangy, Memphis-style BBQ sauce (I use our local grocery store’s brand, but                                  any Memphis-style sauce will work)

1/2-3/4c      Red wine vinegar (secret ingredient!!)

DIRECTIONS:

  1. Place meat in a crock pot. Add 1c of water. Place lid on top and turn crock pot on high for several hours depending on the number of pounds of meat. Check it every couple of hours.
  2. When the meat is done, turn off the crock pot. You will know it’s done when it looks visibly cooked through (pork should not look raw/pink) and easily falls apart when you try to lift it with tongs.
  3. Using tongs, lift out a chunk of meat at a time and place it on a cutting board.
  4. Using two forks, separate the meat from everything else (fat, tendons, gristle, etc.). This is not hard to do, but does take some time.
  5. Then shred the meat with the two forks by pulling it apart.
  6. Put the shredded meat into a saucepot. Pour both sauces and red wine vinegar onto the meat and stir until blended.
  7. Keep the sauce pot on low heat until the sauce has thickened and BBQ is heated through.
  8. If freezing, let the BBQ cool to room temperature first. Never freeze meat hot. This recipe will typically yield several pounds of BBQ because of how the meat is packaged and sold, so call some friends to come over or pack up what you don’t need immediately and freeze it for later. Think sliders, sandwiches and my BBQ Slaw Salad recipe!


Garbanzo Bean Soup

Food pics edited for FB copy 3 - Page 434

Some meals satisfy our appetites. Others fill our souls. This is one of those soul-filling meals for me because of the backstory.

Growing up, eating out was a rarity. These days restaurants – fast food, sit downs, food trucks, etc  – are a way of life; a food group of its own, if you will. But not so 20 and 30 years ago.

So on the very rare day my mom said, “Let’s go out!” I was so excited. One restaurant was very special to me because it was special to my mom.

Enter Cafe Pepe’s in Tampa, Florida.

I was fortunate to grow up in a melting pot city with so many diverse flavors – Southern, Coastal, Latino, Asian, and Soul food to name a few. An authentic Cuban sandwich is still my favorite sandwich in the entire world (no mayo or hoagie rolls allowed!).

Cafe Pepe’s is where my mom went when she needed a pick-me-up. She hardly ever did anything for herself, so if we were going there then it was because it met not just a physical need for food, but an emotional need for comfort. Watching her do this for her selfless self meant the world to me and I wasn’t going to miss it!

Funny thing about this restaurant…I never knew they had menus. Seriously! When we went, we got the same thing every single time. Complimentary dark bread (like a pumpernickel), garbanzo bean soup, and flan (her favorite dessert, and even that was a splurge).

It wasn’t until I was dating my then husband and offered up Cafe Pepe’s for a walk down memory lane, and on a dinner date did I see my first menu with paella and all kinds of yummy dishes.

Visiting Tampa years later, I was so excited to take my kids to this favorite spot, only to find it gone. No! Right then, I promised myself I would recreate their garbanzo bean soup so even though the restaurant may not be there, I can enjoy this comfort food anytime, as well as keep its legacy alive for my mom’s legacy, the grandchildren she sadly never got to meet.

Cafe Pepe’s may be gone, but its memory lives on. I’m not sure what I miss most about this magical restaurant; the incredible food, the dimly lit atmosphere illuminated only by glowing candles, or that this place will always remind me to take time for a little self-care that my mom modeled for us.

After much tweaking, this recipe replicates the taste exactly how I remember it. I tell my kids, “If you want a taste of my childhood, this soup is on point.”

I hope this soup warms your heart and stomachs as much as it does ours.

INGREDIENTS:

6 cans                Unsalted chickpeas/garbanzo beans

1 ½  large          White or sweet onion; diced, I used frozen

4                        Mixed fresh peppers (red, orange, green & yellow); diced

2 pkgs                Polish Kielbasa or smoked sausage links, fully cooked; sliced into bite-sized pieces (I use skinless, no MSG) * Turkey sausage does not work well in this recipe. Use beef, pork or a combination of both.

2, 32oz boxes     Reduced sodium chicken broth

1, 32oz box        Reduced sodium beef broth

1T                      Parsley

4 cloves             Garlic; minced

1t                      Salt, to taste

1/2t                   Pepper

1/4t                  Cayenne pepper (a.k.a. crushed red pepper)

1t                     Herbs de Provence

DIRECTIONS:

Crockpot –

  1. Drain & rinse beans.
  2. Add everything to crock pot and cook for 5 hours on low then 2 hours on high or until peppers are soft.

Stovetop –

Add everything to large stock pot on stove and heat until boiling and peppers are soft. Simmer until ready to serve..

Freezes great!

Winter Salad

Food pics edited for FB copy 3 - Page 431

If you can name the ingredients in a typical salad, then it’s time to change what’s in the bowl.

I was craving a new salad this week, and after concocting this one it is now one of my all-time favorites! It’s not a light, sweet summer salad. Although a chilled salad, the eclectic collection of tangy, tart and savory ingredients makes this winter salad perfect for cold weather or any time of year.

The smoky bacon pairs perfectly with sweet green peas. The crunch of walnuts plays off the soft quinoa. Tangy pickled onions and zesty blue cheese spice up the light tomatoes. The dressing has warm, layered flavors of balsamic vinegar, red wine and spicy brown mustard – and a little will go a long way. It adds just the right amount of zip without dominating the salad’s flavor. Add chicken for an entree salad, or omit it for a lighter side side.

If you’re looking for a salad to IMPRESS, this is it. Pull up a seat at the adult table and enjoy this awesome, healthy, hearty meal!

Food pics edited for FB copy 3 - Page 429

SALAD INGREDIENTS:

2, 5oz bags of mixed greens for 4 entree salads

3c of Brussel sprouts; raw chopped thin with stalk ends cut off

2 handfuls of petite peas; frozen

Quinoa; plain, cooked per bag directions with salt & pepper to taste; COOLED (about 1/2c cooked for each salad)

1 pint cherry or grape tomatoes; halved

Half-handful of green onions; chopped

2 handfuls of pickled onions – for recipe click HERE (I’ve tried several recipes and this one is by far my fav – and one batch will last a month!)

2 handfuls of pumpkin seeds; roasted, shelled

2 handfuls of walnuts (or pecans); chopped or pieces

2.5 oz blue cheese; crumbled

2 handfuls of bacon (I use the Kirklands precooked & crumbled and keep it in the freezer so I can use any amount and throw the bag back in the freezer for later.)

Chicken; Rotisserie cooked, pulled and chopped

DRESSING INGREDIENTS:

1c Olive oil

5T Balsamic vinegar

4T Spicy brown mustard

3 Cloves fresh garlic; mined

1T Agave syrup

1T Red wine

1T Red wine vinegar

Pinch of salt

Food pics edited for FB copy 3 - Page 430

DIRECTIONS:

Salad: Divide ingredients into 4 bowls. Wrap each bowl with plastic wrap and store in fridge. Just before serving, take 1 bowl at a time and dump that bowl’s ingredients into a large mixing bowl and toss thoroughly. Add the tossed salads back into their respective serving bowls.

*The quinoa can be cooked the day or two before. Add the peas & bacon frozen, they will be thawed by the time you’re ready to serve the salad.

Dressing: Add all dressing ingredients to a food processor or blender and blend until thoroughly combined. Let dressing warm to at room temperature to avoid the olive oil from thickening once refrigerated. Blend dressing into the bowls when tossing. You will have dressing left over. Yay!!

Enjoy! 🙂


Mexican Chicken Salad

50/50 Spring greens and baby spinach
Grilled chicken; chopped & seasoned w/salt, pepper and garlic powder
Sauteed yellow onions, red & orange peppers; chopped & sauteed in grapeseed oil
Green onions; chopped
Grape or cherry tomatoes; halved
Canned corn; no salt added, drained
Canned black beans; no salt added, drained and rinsed
Canned pinto beans; no salt added, drained & rinsed
4-cheese Mexican blend shredded cheese
Avocado; sliced
Salsa; drained
Tortilla strips (optional)
Sour cream (optional)
Guacamole (optional)
Best paired with a Mexican ranch or jalapeno vinaigrette dressing
Splash of plain rice vinegar

If there is a Chuy’s restaurant nearby, their creamy jalapeno dip is awesome on this salad!

Sweet Fruit with Chicken Salad

I’m obsessed with salads! They are probably my favorite food because of their diversity. Unfortunately, they can get a boring wrap. Not so! Start with a green base and salads can take on any flavor and any culture. They can be served warm or cold, spicy or sweet – the possibilities are endless!

This week I made two different salads: Mexican and Sweet Fruit.

Sweet Fruit with Chicken Salad

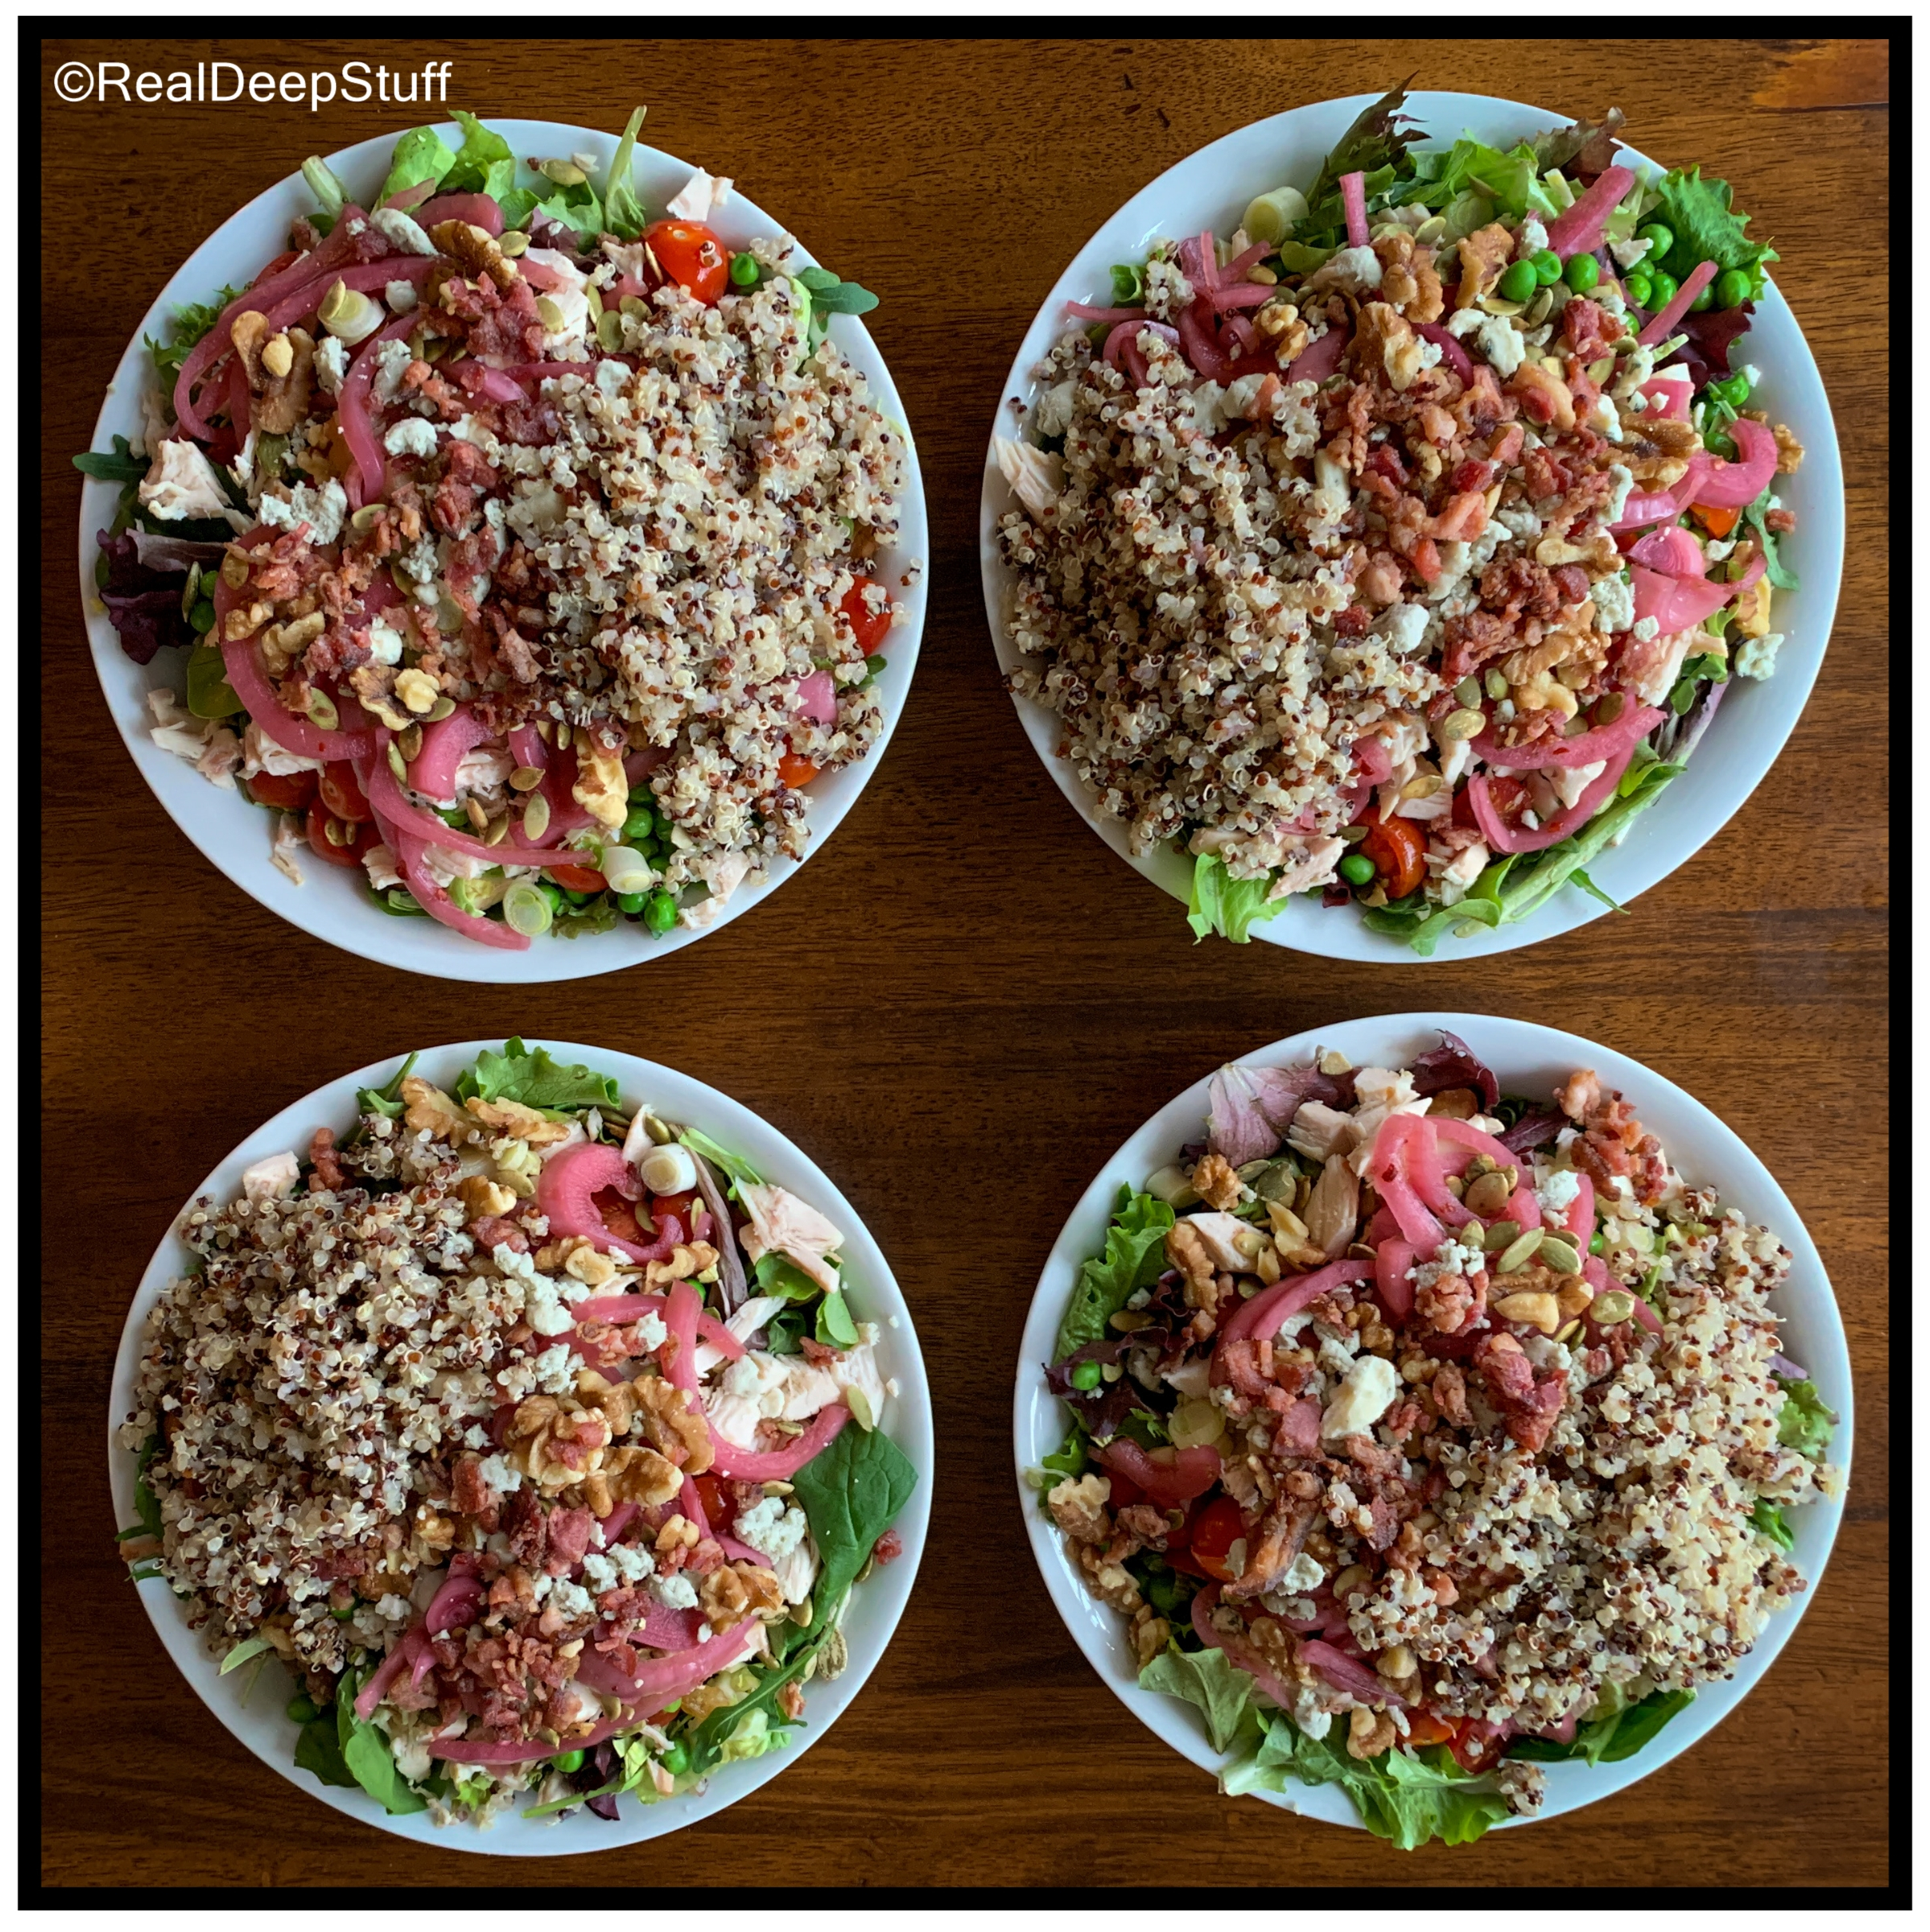
50/50 mix of spring lettuce and baby spinach

Grilled chicken breast; chopped, seasoned with salt, pepper & garlic powder

Green onions; chopped

Grape or cherry tomatoes; halved

Canned mandarin orange slices in water, not syrup

Crumbled blue cheese

Pecans

Roasted pumpkin seeds

Seneca Granny Smith apple slices

Dried cranberries; 50% less sugar

Best paired with Panera’s Fuji Apple Vinaigrette Dressing or Brianna’s Blush Wine Vinaigrette

Splash of plain rice vinegar (My secret sauce to give salads, especially those on the sweeter side, a zesty kick as well as thin out thick dressings.)

Enjoy!!


TwoFer Crustless Quiche & Pasta Salad

I am SO excited to have our son home from college for Christmas break. With a full house, I wanted to have some homemade meals on hand, but didn’t want to spend a ton of time and energy in the kitchen with all of the other to-do’s on the list this time of year.

Inspired by a lack of time, I decided to make two very different dishes that have overlapping ingredients so I could reduce my work and shopping list.

These two recipes have similar ingredients, but different bases. With that, and switching out a few key ingredients, they have different tastes, textures, temperatures and mealtimes. So we’re getting a TwoFer… two recipes for one trip to the grocery store and one amount of time & effort. Yes!

TwoFer Crustless Quiche & Pasta Salad

Crustless Quiche

10                           eggs

1 1/2c                     milk

2c                           Taco Bell Ranch Monterey Jack shredded cheese

12oz                       sweet or white onion; chopped (I use frozen) OR fresh leeks; whites                                            sliced thin; do not use the green stems (freeze them for soup stock)

3-4                         slicing tomatoes; sliced thin (Roma, small beefsteak, etc)

Cooking spray

Pasta Salad

16 oz                     Fusilli (corkscrew), penne OR farfalle (bowtie) pasta

1/2c                      pine nuts

1 bunch                 green onions; chopped

2 pints                   grape OR cherry tomatoes; whole

1T                         grapeseed or vegetable oil

1lb                        fresh mozzarella; cubed

(Vinaigrette)

5T                         lemon juice

5T                         white Balsamic vinegar

4T                         olive oil

2T                         sugar or agave

1/2t                      salt

Both Dishes

3 cloves               garlic

2t                        dried or fresh basil

Salt & cracked pepper to taste

1                        orange pepper; diced

2t                       grapeseed or vegetable

1 bag                 fresh baby spinach; chopped

1 1/2c                bacon; cooked & crumbled (I buy mine from Costco)

16oz                  ham; sliced, butcher cut or “off the block” cut

Directions:

Use two bowls, one for each recipe.

Quiche Bowl:

  1. Preheat oven to 350.
  2. Mix eggs, milk, cheese, 2t garlic, basil and salt & pepper.
  3. Saute onion in 1t oil and slowly add to bowl to temper the egg mixture.
  4. Saute orange pepper in 1t oil and add half of it to quiche.
  5. Add half of the spinach, bacon and ham and blend well.
  6. Pour into greased 10×10” casserole dish.
  7. Slice tomatoes thin and place on top. Slightly press tomatoes into the quiche so the tomatoes stay soft.
  8. Bake for 25-30 min until cooked through.

Pasta Bowl:

  1. Cook pasta al dente (9-11min) in salted and oiled water (about 1T of vegetable oil).
  2. While pasta is cooking, make the vinaigrette by combining all ingredients in a container with lid and shake well.
  3. Drain pasta and pour into bowl and add vinaigrette while pasta is hot; mix well. Vinaigrette will absorb into the pasta as it cools.
  4. Add 1t garlic, basil, salt & pepper. Mix well.
  5. Add half of the orange pepper, spinach, bacon and ham.
  6. Add pine nuts and green onions.
  7. Saute grape tomatoes in oil until they blister and begin to pop. This greatly increases their flavor. Do not overcook. They should keep their shape as in the photo below.
  8. IMG_E6709[1]
  9. Add tomatoes to pasta bowl and gently toss.
  10. Add mozzarella and gently toss.
  11. Cover and refrigerate until chilled.
  12. Stir before serving.

** You can switch out ingredients based on preference, food allergies and what you have on hand.

Quiche freezes well.


Culinary Quest #11 Fresh Corn & Basil Salad

Welcome to one of my very favorite salads! It’s refreshing, filling and healthy – the trifecta for side dishes or as an entree.  Before reaching for the typical potato salad, cole slaw, etc. which are high in fat and, well, boring, give this taste of summer a try!

It all started with extra corn I had on hand and needed a side dish for dinner (I way over-estimated the number of ears I bought). So I gathered other items we had on hand and experimented to see what cooked up.

This salad was love at first bite!! The combination of sweet corn, savory basil, buttery avocado, and bitey pickled red onion – this is quintessential summer flavor with beautiful colors and textures.

Ingredients:

5 ears of fresh corn; steamed or roasted, cooled and cut off the cobs (NOT canned corn)

1 cup pickled red onion; chopped (This is my favorite pickled red onion recipe, but should be made at least one day before for full flavor, thanks Brenda for such a delicious recipe!) *NOTE  If you don’t have time to pickle the red onion, use fresh red onion finely diced.

3 medium-sized fresh tomatoes; diced

2 cups fresh basil; measured before chopping

1 cucumber; diced

1 avocado; diced

1 cup mozzarella; diced (optional)

Dressing Ingredients:

4T white balsamic vinegar

2T olive oil

1/2t-3/4t salt to taste

1/2t black pepper

1/2t granular sugar (I use raw sugar)

2 cloves fresh garlic; minced

Directions:

Add all prepared ingredients into a large mixing bowl.

Add all dressing ingredients into a seperate bowl. Whisk together and immediately pour over the rest of the ingredients in the bowl.

Gently mix everything together. Store covered in the refrigerator until ready to serve. Stir again before serving.

* This recipe can be served immediately and does not need to set up for full flavor. It will keep for 1 day in the fridge, but it’s best served the day of. If you need to make it ahead of time, swap regular tomatoes for grape/cherry tomatoes to keep the tomato juice from producing too much liquid, and hold off adding the avocado until ready to serve. Enjoy!


Culinary Quest #19 – OREO Truffles, non-refrigerated

IMG_6517

There are a million OREO truffle recipes online. The maddening thing is, they are all the same! That recipe calls for mixing OREO cookies with cream cheese.

The problem is, because the truffles aren’t baked they need to be refrigerated due to the cream cheese.

Our family coordinates a huge bake sale every Christmas. I’ve always wanted to add OREO truffles to the truffle selection we already offer, but I can’t in good conscious offer an item to the general public that needs refrigeration. We don’t want anyone getting sick on our watch. Yikes!

So this year, I tackled making up my own OREO truffle recipe that needs no refrigeration. This is so good (and easy) I wish I had tried it years ago.

I’m posting this recipe for everyone who has also been looking for OREO truffle that doesn’t need refrigeration. I’ve read so many comments and threads stressing concern over the cream cheese, I hope this will be helpful.

I included a photo, but will preface it by saying I literally whipped these together simply as a test recipe. It’s not my best-looking performance, but wow do they taste heavenly!

OREO Truffles, non-refrigerated

Ingredients:

1 – 14oz pkg OREO original cookies (I don’t recommend generic brands as they are softer than the OREO brand)

1 can vanilla or cream cheese frosting (Cream cheese-flavored frosting does not actually contain cream cheese so these truffles do not need to be refrigerated.)

1t vanilla

2 pkgs marshmallow Candy Melts (If marshmallow melts aren’t available, use “white” melts which are vanilla flavored or almond bark.)

Directions:

  1. Crush OREO cookies till pulverized (I use a food processor). Save back about 1/4c.
  2. In mixing bowl, combine crushed OREO cookies, frosting and vanilla. Mix until blended (I use my hands).
  3. Shape into balls and place on parchment paper. (No chilling for firmness required!)
  4. Melt Candy Melts according to directions on the bag, one bag at a time.
  5. Dip the OREO balls into the melted marshmallow melts.
  6. Extract them from the melted melts by using a small spoon. The filling gets soft with the hot melts so it slides through a fork.
  7. Immediately sprinkle a little of the reserved crushed OREO cookies on top of each one as you go before the coating hardens OR using melted chocolate, drizzle on top.

Culinary Quest #18 – BLT Salad

DSC_3028

Who doesn’t LOVE a BLT sandwich (or anything with bacon, frankly)? It’s one my all-time favorites. But, I’m trying to watch my bread intake so I can’t remember the last time I got to sink my teeth into one of these little beauties. 😦

Standing in the produce aisle the other day, I tried to think of a salad to go with the soup I was making for dinner. One of my family’s favorite salads is a Caesar salad, but that also means we have it fairly often. Spring-boarding from the Caesar, I took its elements and swapped them out for new ingredients and voila! The idea of a BLT in salad form was created right there between the bananas and broccoli.

It tastes exactly like a BLT sandwich! Seriously! Without the bread. 😉 It’s light and refreshing, and the sweet tomatoes compliment the salty bacon. The ranch dressing substitutes for the mayo perfectly. Just in time for spring and summer, this salad is a new favorite.

One of my teenagers said to me today that he literally dreamed about this salad after having it last night and that it was on his mind all day today at school. Who knew? Score!!!

It’s so easy it’s almost embarrassing. Here we go…

Ingredients:

* 1 bag of Romaine lettuce (I mixed it with a bag of spring mix lettuce for a variety of color and texture)

* 1 pkg thick cut bacon

* 1 pint grape (or cherry) tomatoes; halved

* 1 bunch green onions; chopped

* 1 cucumber; diced

* 6oz of ranch salad dressing (we use Marzetti’s simply dressed ranch)

* croutons (optional)

Directions:

Cook bacon in oven at 350 for about 30 minutes. Flip it over and cook another 10 or 15 depending on desired crispiness.

While bacon is cooking, toss remaining ingredients together in a large bowl (EXCEPT DRESSING!).

Once bacon is drained and cooled, chop it and add to bowl.

Right before serving, toss salad with dressing. Serve immediately.

Yields 4-6 servings.

Enjoy!

Culinary Quest #17 – Bacon & tomato pasta salad

DSC_0261-002

Recently I visited Fresh Market, a high-end grocery store. They are known for their fresh products, including a delicious deli.

I purchased a small cup of their bacon & tomato pasta salad and liked it. However, I found it needed a few tweaks, so below is my version of their pasta salad.

The tweaks: Store-bought salads are mostly pasta (because it’s cheaper and goes farther). I prefer to increase the other ingredients to reduce bad carbs, increase good cards and increase protein. I also added a couple of ingredients that bring natural sweetness (peas) and a warm, nutty flavor (pine nuts) to this light dish. I also substituted white wine vinegar for balsamic vinegar because it gives just an extra spark of fruity bite that regular wine vinegar doesn’t offer.

We rarely use mayonnaise in our home and most times the jar expires before we can finish it. But, inching closer to summer, sometimes mayo adds a creamy texture to pasta salads that oils simply can’t do.

This dish is served up just in time for Easter brunch, a lazy Saturday (as in our family’s case today :)), lunchboxes for work or school, parties, or a savory snack. Enjoy!

Bacon & Tomato Pasta Salad

Ingredients:

1# boxed pasta; cooked al dente, drained (any kind will work, we had rigatoni on hand)

2 pkgs thick-cut bacon; cooked & chopped

2c green onions; chopped (1 bunch)

1 1/2c celery (approx 4 stalks); chopped

2 pints grape tomatoes; cut in halves

1c pine nuts

2c frozen peas (use them straight out of the freezer)

1t salt

1/2t pepper

1T + 1t white balsamic vinegar

3/4c – 1c mayo (for this recipe I used Duke’s regular mayo); measure to preference

Directions:

Bake bacon in oven at 375 for about 30-45 minutes until done.

While bacon is baking, boil pasta (add salt to pot) for 12-14 minutes.

While both of those are rockin’ & rollin’ prepare remaining ingredients and put them in a large bowl.

Add cooked bacon.

While pasta is still slightly warm, mix into bowl.

Store in fridge. That’s it! 🙂